Sunday, April 25, 2010

The Beauty of Spring: Part 2

As I promised here is my finished lariat made from my Glass Beads from Artbeads.com.  I reviewed them in my last post here.  I started out by making the bees and the flowers and then it was time to make all of the vines full of the many shades and colors of green that show up in the spring.

I worked on this piece as I found time an energy from late February when I received the beads until the 8th of April when I finished it just in time to where it while I was attending Wire Fest in Philly.  I got a lot of comments on the piece and figured out that I needed to do a tiny bit of tweaking since the way the piece sat when flat was different than when it was being worn and my bees need further anchoring.

I really enjoyed working with all of the beads that I received and think that the bead mixes are indeed a great way to get the different sizes you need for a freeform peyote piece.  I may have to play some more with free form peyote, maybe developing a class to teach how to make a bracelet or something.


I felt very springy wearing my new piece and and it works well with my general style for my work which tends to be fairly organic and inspired for nature.
Once again my dress form gets put to use with my jewelry.  It works great to photograph my larger/longer pieces as well as giving me a place to work on the larger pieces that I want to conform to the bodies shape.

I had to include this last photo which show the fact that I ended up with some beads left but not lots.  I was unsure how many packages of the mixes to get and although I could have added more to my lariat to use up even more than I did I stopped when the piece felt finished.  I am really impressed that I didn't end up with that much left over.  I think those 2 extra wings might have to go onto an angel for my studio.

Disclosure...As a reviewer of products at Artbeads.com, I receive the Glass Bead elements above free of charge. I have been asked to review these products and give my honest opinion of the products...positive or negative. I am not being compensated by Artbeads.com for my endorsement as it pertains to the products received and reviewed.

Friday, April 23, 2010

The Beauty of Spring

In February Artbeads.com contacted me for  the next installment of Blogging for Beads.  They had decided to go for the theme "The Beauty of Spring"  We could choose any types of beads to review with the object of making a piece or pieces with spring as our theme.  I tossed around lots of ideas and although I knew that I was going to have a super busy next month or two I decide to go for a more time consuming project.

While I was sketching out some ideas to figure out what I wanted to do Wayne thought since I had been putting butterflies and especially dragonflies in my work that I should include some bees in this piece.  I also wanted to use only the stuff that I got from Artbeads.com except for the thread which I always have plenty of.

From the beads that I got with my previous shipment my review mentioned that I thought that the 
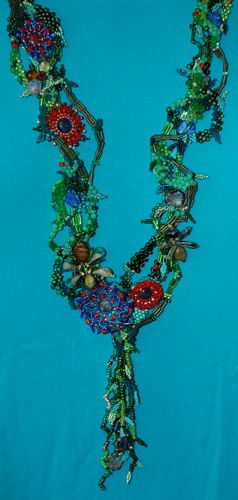
bead mixes from Toho would be so cool to do a freeform peyote necklace out of so I decided to do a vine necklace with flowers and some bees made out of glass beads.  Then came the challenge figuring out what beads would make my "vision" come to life.  How many packages of mixes, what kind of beads to use for the flowers and how to make the bees and what glass beads would work best to combine to make a bee. I must admit surfing through all of the glass beads going back and forth and looking at all of the cool beads was fun.

I ended up using a little wire to make the bees since this allowed me to give them shape but also to give them antenna.  The first bee (on the left) is made from a 9 x 6 mm Opaque Jet Black w/ Half Picasso Roundelle for the head, 4- 15 x 6 mm Jet/Picasso Daggers for the wings and a 11 x 9 mm Wasabi w/ Picasso Spots Oval for the body. This is my favorite of the bees and I love all of the beads that he uses although I really think the wings are just way too cool.  I also got these to use on my 2010 BJP pieces with my last selection and they show up in my January BJP block.

 The second bee has a 10 mm Wasabi with Picasso Spots Lentil, 4- 18 x 8 mm Topaz Duckbill beads and a Czech Glass Brown Mix w/ Blue Picasso Oval.  This one looks most like a bumble bee and is probably the most bee like.  I love the stripes on the body bead.  The shape of the duckbill beads is interesting and I think they could be fun to experiment with.

The last of the 3 bees uses a Czech Glass 8 mm Coin Green Stone, Czech Glass Amber with Gold Luster Small Spades for the wings and an 11 x 9 mm Matte Crystal w Picasso Oval.  I had gotten 4 beads of the wings of each of the bees but for this small guy I couldn't figure out how to make the four wings fit so he only got two wings.  I think the small spades would make great angel wings.

These are the beads that I got for the flowers.  I got Blue Silk/ Picasso and Blue/ Jet Silk flowers to use as well as 10 mm lentils in Blue Silk w/ Picasso and Red w/ Light Picasso to be the center of 5 more flowers that I was going to use a combination of brick stitch and netting to make the "petals" of.  For the petals of the flowers I got Toho bead mixes in Reds/Ambers and Blue Water.  I have some of the flower beads and lentils to use in my BJP pieces although some of the colors are different.  Both shapes would work well with lots of different types of projects and are available in lots of interesting colors.
And here you can see what that pile of lentils and mixes turned into with some stitching.  There weren't that many seed beads left and those got thrown into the mixes for the vines.  The great things was that these were fun and quick to make.  I think that some of them would make neat earrings.
Here is a photo of the Spring Apples mix of beads,  it was my favorite of the vine mixes and pouring out the 10 packages made just a yummy springy mix that was inspiring all on it's own.
To make my life a bit simpler while doing the free form peyote stitch I separated the Toho mixes in the  Spring Apples, Mint/Forest and Forest Green into the different sizes of beads. (Yes I am a bit obsessive at times.) You can see the piles of 8/0, 11/0, 15/0 and bugles in their tray and the very beginning of the lariat that I would be making.
These last 2 photos show the beginning stages of the lariat.  This was my first attempt at free-form peyote and although like any peyote project it took a fair amount of hours to do the piece I found it amazingly relaxing.  I think that part of that was that it was my only creative project for the month and because it was for me a fun project that I just made decisions as I went going "where to now" and knowing that there were no wrong answers.  I will post the finish project in a couple of days.


Disclosure...As a reviewer of products at Artbeads.com, I receive the Glass Bead elements above free of charge. I have been asked to review these products and give my honest opinion of the products...positive or negative. I am not being compensated by Artbeads.com for my endorsement as it pertains to the products received and reviewed.

Wednesday, April 21, 2010

Catching Up

I must apologize it has been way too long since I have written.  Things have been crazy busy and we have gotten so much done in the last 2 months. March was our craziest month by far with constant things to keep us busy but the to-do lists just seem to grow faster than we can check things off it seems.

I am just going to include some of the highlights of what we have been up to and will try to find time to hit some of the projects in more detail as I have time.  The first photos is of Wayne mudding the walls of the great room.  We added another layer of dry wall to 3 of the walls in there.  Why in the world you might add (really good question).  We added a product called Green Glue between the layers of drywall. Green Glue is a product that helps with sound dampening so that the acoustic properties in the room will be better.  We also added an additional layer of sub-floor in both my studio and the great room with Green Glue between the layers.  In both cases the hardwood flooring went in on top of the new subfloor.    We ended up putting Brazilian Koa (also known as Tiger wood) in both of those rooms.
 So far we have put in hardwood flooring ourselves in the master suite, my studio and the upstairs hallway and the great room.  This is it for a few months at least for flooring since we need to catch up a bit but we will also be adding hardwood in the kitchen and the dining room when we have a chance.

The second photo is of Wayne painting,  we have also done a lot of painting since we closed of the house but still have plenty to do.  The great room is where he is painting in the photo and the walls are now Honorable Blue and Hyper Blue( If you want to see these colors you will have to open the color visualizer and then explore colors).  Once more we are not going for subtle colors anywhere but so far we both love how things look with all of the color.  The third photo is a part of my studio as it was a couple of weeks ago.  The studio keeps changing and will continue to as things come in and out of it and  I try to get it organized.  I still need a trip to Ikea to buy some furniture for it so I can really start getting it organized but we need to rent a cargo van for the trip since neither car is big enough for all of things I want/need.
This photo is of the sewing room with some of it's boxes.  The end of March we took possession of our stuff that has been in storage for the last 9 months.  Of course all of these boxes mean all kinds of more work to be done.  We have unpacked quite a few boxes but have plenty more to do.  Normally at this point I would have more unpacked than this but since we still have to figure out where some things will be going and still have spaces that need painting and furniture it is going to take longer before all of the boxes are put away.

Less than a week after the movers we had visitors for a few days of spring break.  Ryan, Renee and Trevor came down.  We had managed to get the guest beds usable and although their rooms were decorated with boxes still they had a good time and it gave us a couple of days to just chill a bit.

This photo shows the great room painted but not finished.  We still need to buy some additional trim and paint it.  Along with the 2 colors of blue there will be some white trim and some red trim.  Although with red white and blue you would think it might look patriotic but so far it doesn't.  The Hyper blue helps since it is sort of a cyan blue that doesn't look like a patriotic blue.  The television in the great room was acting up before we moved and is pretty much nonfunctional at this point and parts have been ordered for it.  When we get it working the couch will go into the great room and we will see about getting that room more finished.

The last photo I am going to leave you with is the fireplace in the great room.  I painted it red and added some copper to it (it looks more gold in the photo than copper).  If you would like to see more photos please visit my web gallery and visit the Decorating our house. There are around 240 photos in there at the moment.