Showing posts with label Backsplash Mosaic. Show all posts

Thursday, September 1, 2011

Out of the Dirt Grow Iris

Those Iris need some dirt to grow in.
With as much time as I have been working on other projects including planting lots of real plants in our garden the mosaic has been taking a while to finish but that was expected.  I need to quit adding new thing to my to-do list, but as I write this I am getting ready to order Iris and bulbs to plant in the yard this fall.  A day before Hurricane Irene visited I was at Lowes getting a few things and ended up buying more clearance plants for the garden (they still need to be planted).
A bit of a closer look at the dirt.
Beading the dirt took 9 1/2 hours.  I was pretty impressed as it seemed to go fairly quickly.  When I was at Wire Fest in the spring I found some copper beads that are a bit bigger than 6/0 seed beads but they were wonderfully copper and copper seed beads were hard to find when I was ordering.  They are very irregular in shape and size which I like especially in the dirt since it gives the dirt more visual texture.
The other side of the dirt, shades of browns and blacks to coppers.
I like how the green leaves pop against the browns, blacks and coppers of the dirt.  The little copper leaves that are sprinkled amongst the dirt are not very tall so I will have to be careful when removing the excess grout to make sure that they show up.  

Blues and purple beads for the Iris.
 In the photo above you can see the piles of the different blues and purples that I chose to make the Iris with.  With the greens and the browns I was able to get all of the colors onto one tray but not so with the Iris colors.
My first Iris completed
 When doing the Iris I started all of them by doing the yellow throats first  and then did a few of the lighter colors that surround that.  After that I did each petal of each Iris one at a time.  I tried to use edges and values to separate the petals visually and think some worked out slightly better than others but think that I got the general look I was after.
Another Iris complete and a butterfly comes for a visit.
 Here you can see a closer look at the second Iris I beaded and a butterfly pendant I cut the loop of so that he could join the Iris in the garden.

Here you can see I started all of my Iris with the yellow of the stamens. 
Here you can see the first two Iris beaded together.  It has been really interesting for me to see this piece slowly emerge from sketches to a piece that will one day adorn our kitchen.  I know that adding grout will further change how the piece looks and I can't wait to see how this continues to evolve.

Three leftmost Iris beaded.
It is interesting that as I work on the piece how I approach the different sections slightly differently in how I add the different values and colors.  I have just been going with what feels right for each area hoping that my approach will get the feel I am after.
All 5 Iris beaded.
The Iris took 36 hours of work to get them completely beaded.  Most of the time I can only work on them an hour or two since my hand gets tired with the tweezers but I have had a few sessions that were longer when I was in the groove. As shown above the piece is at 64 1/2 hours of seed bead work.

Next time more leaves and some background.

Thursday, May 19, 2011

Iris Backsplash: In the Beginning

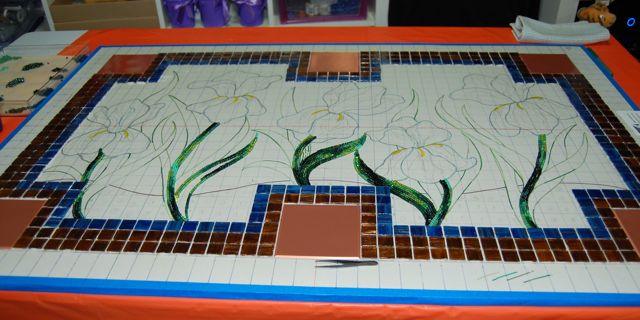
When I  left you in the last post you knew that Iris were my inspiration for the backsplash that I was going to make for behind the cooktop in our kitchen.  One of the first jobs after we decided this project was a go was to make up the substrate for the piece,  the picture above has it cut to size.  Our first purchase was trim to go around the edge so that the piece could be attached (and removed) from the wall and the trim will cover the screws.  I wanted to use some tiles around the edges to help frame up the piece so they were the next decision and purchase.  You can see the metal tiles sitting in the middle of the background.  I marked up approximately where the trim and tiles would go so that I could figure out where the Iris would go.

In this photo I have roughed in where the flowers would be going (you can click on the photo and it should show it larger).  I used the original scale drawing as a general guideline but since the tile is different than the original vague ideas I made adjustments.  You can also see the grid that I sketched on to make placement easier and which I used to help figure out how many square inches of bead I was going to need to order.

I used mastic (tile glue) to glue down all of the metal and glass tiles.  If you look closely at the top center you can see where I ran 2 short of the blue tile.  Something else will be added there later.

In this picture you can see where I have taken my rough sketch and firmed and cleaned up the idea and then used markers to outline the areas.  Wayne suggested adding more leaves so there would be less background so instead of 2 leaves the flowers now have 3-4 leaves each.  I used  this to try to figure out approximately how many seed beads to buy (more guess than not).

Wow,  I ended up with a 7 pound box that was mostly seed beads for my mosaic and the big question was; would this be enough?  Enough or not it sure was fun opening the box. I had a couple of colors that were backordered so would have to start on something that didn't require them.

And then it was time to start I put all of the values and shapes of green beads out on a tray and it was time to start playing.  As you see these photos realize that each bead is added by tweezers one bead at a time.  I tried using my fingers but even using the larger 6/0 seed beads my fingers just got in the way.  Even doing this with tweezers it has gone faster than I expected it to.

I started the greens by doing each of the stems first and then added leaves here and there working back and forth across the piece.  Doing this way had two goals; the first was that since I had pulled some beads from my collection that were the correct size but that I didn't have a lot of I didn't want them to end up in all in one flower and that as I worked at different times how I approached the values varied and I didn't want that to show up.

I generally approached the leaves by doing the outside edges first,  this gave them fairly smooth lines along the outside,  I also chose the leaves that were in front to do first, hoping to use value and such to separate the  front and back leaves.

Here you can see a bit more of the value changes and  the different shapes, values, and finishes on the beads.

Here is where the leaves stand at this point, the disadvantage to guesstimating the amount of beads that I needed was that I ran out of some of my values of green beads and will need to order more,  not sure how I got it so wrong (wonder if I figured out how many before I added the extra leaves).  I am waiting to order more beads until I figure out if I just went wrong on the green or not.  The hour count on the leaves at this point is 19.  I have been tending to work using quarter hour segments so that I can keep track of the beaded part of the project.  The little dots on the bottom are copper leaf beads that you will see better when we add the dirt next time.

Tuesday, May 17, 2011

Iris as Inspiration

As I got ready to start blogging about my newest really big project I realized that I wanted to show some of the background of how Iris have inspired some of my previous pieces of art.

The purple Iris shown here are happily growing in my garden, my Mother sent them to me from her garden in Iowa and before that they were in her Mother's garden.  I think Iris are incredibly beautiful flowers and there are so many varieties out there that no matter what color you like you could probably find some to please you.

Since I started beading Iris have shown up in several of my pieces and I am sure that like other flowers will continue to show up.

The first beaded piece I made that used the Iris is my necklace below.  I made it for a contest at Turquoise String Beads in Fall River, Massachusetts where I got my beading start.  They were having a summer themed contest and I designed this piece for it.


After I started doing bead embroidery I knew that I absolutely had to make an Iris piece.  Even with size 15/0 beads (which are quite small); I knew that the piece would have to be fairly large to get the details that I wanted.  I had this purse that gotten at a charity sale and realized that it would be the perfect canvas.  With lots of photos of Iris in hand I played with ideas until I came up with what I wanted.


I used 50 colors of seed beads for the purse to allow me as much freedom with values as possible.  The Iris has some ruffled edges to the petal which helps give dimension to the flower.  This purse is still one of my favorite pieces that I have made.


My pond piece was inspired by some Iris we saw in a little pond when we were hiking  in New England.  I mad this piece to enter into the Bead Dreams contest for their crystal category.  The Iris in this piece is entirely 3-dimensional and was added after it was made.

At Bead Fest in Philly last year I took a Mini Mosaics class from Joan Babcock.   In class we learned how to make mosaic pendants using seed beads instead of tiles.  I loved the idea, how cool and "what if...."

Oh how I love the "what if"s,  when my creative brain slams in to high gear and takes me for a ride.  What could you do with this technique only bigger?  A mirror frame?  A piece of wall art?  Or how about a backsplash for behind our cooktop in our kitchen?  Mmmmmm......  I like that idea.  We didn't have our builder put in a backsplash because we didn't like any of their options, we wanted something more interesting.  I had been trying to think of a really cool idea for over the cooktop and then we were going to use that to pick the rest of the backsplash for the kitchen.

Since we weren't in a huge hurry I could take on this project which I knew would be a big undertaking.  The project started with measurements and a to scale drawing so I would have an idea of what I wanted to do.  Hmmmm.... what did I want to do?   At this point we had already painted the kitchen blue and copper.  Nature has always been my go to inspiration and the idea of using Iris just jumped out as an image that we would enjoy year round and could pick up on the blues and coppers in the room.

The scale drawing was a rough idea and gave me an idea if I could make it work and what I wanted to use and to see what Wayne thought since as always he was funding the project (luckily he doesn't have to pay me by the hour).

The photo above has the drawing that is sitting on top of the substrate that I am using for the mosaic.  I will leave you with this and continue with the project in my next post.  If you can't wait you can check out the photo album of this on my facebook page.