Thursday, May 19, 2011

Iris Backsplash: In the Beginning

When I  left you in the last post you knew that Iris were my inspiration for the backsplash that I was going to make for behind the cooktop in our kitchen.  One of the first jobs after we decided this project was a go was to make up the substrate for the piece,  the picture above has it cut to size.  Our first purchase was trim to go around the edge so that the piece could be attached (and removed) from the wall and the trim will cover the screws.  I wanted to use some tiles around the edges to help frame up the piece so they were the next decision and purchase.  You can see the metal tiles sitting in the middle of the background.  I marked up approximately where the trim and tiles would go so that I could figure out where the Iris would go.

In this photo I have roughed in where the flowers would be going (you can click on the photo and it should show it larger).  I used the original scale drawing as a general guideline but since the tile is different than the original vague ideas I made adjustments.  You can also see the grid that I sketched on to make placement easier and which I used to help figure out how many square inches of bead I was going to need to order.

I used mastic (tile glue) to glue down all of the metal and glass tiles.  If you look closely at the top center you can see where I ran 2 short of the blue tile.  Something else will be added there later.

In this picture you can see where I have taken my rough sketch and firmed and cleaned up the idea and then used markers to outline the areas.  Wayne suggested adding more leaves so there would be less background so instead of 2 leaves the flowers now have 3-4 leaves each.  I used  this to try to figure out approximately how many seed beads to buy (more guess than not).

Wow,  I ended up with a 7 pound box that was mostly seed beads for my mosaic and the big question was; would this be enough?  Enough or not it sure was fun opening the box. I had a couple of colors that were backordered so would have to start on something that didn't require them.

And then it was time to start I put all of the values and shapes of green beads out on a tray and it was time to start playing.  As you see these photos realize that each bead is added by tweezers one bead at a time.  I tried using my fingers but even using the larger 6/0 seed beads my fingers just got in the way.  Even doing this with tweezers it has gone faster than I expected it to.

I started the greens by doing each of the stems first and then added leaves here and there working back and forth across the piece.  Doing this way had two goals; the first was that since I had pulled some beads from my collection that were the correct size but that I didn't have a lot of I didn't want them to end up in all in one flower and that as I worked at different times how I approached the values varied and I didn't want that to show up.

I generally approached the leaves by doing the outside edges first,  this gave them fairly smooth lines along the outside,  I also chose the leaves that were in front to do first, hoping to use value and such to separate the  front and back leaves.

Here you can see a bit more of the value changes and  the different shapes, values, and finishes on the beads.

Here is where the leaves stand at this point, the disadvantage to guesstimating the amount of beads that I needed was that I ran out of some of my values of green beads and will need to order more,  not sure how I got it so wrong (wonder if I figured out how many before I added the extra leaves).  I am waiting to order more beads until I figure out if I just went wrong on the green or not.  The hour count on the leaves at this point is 19.  I have been tending to work using quarter hour segments so that I can keep track of the beaded part of the project.  The little dots on the bottom are copper leaf beads that you will see better when we add the dirt next time.

Tuesday, May 17, 2011

Iris as Inspiration

As I got ready to start blogging about my newest really big project I realized that I wanted to show some of the background of how Iris have inspired some of my previous pieces of art.

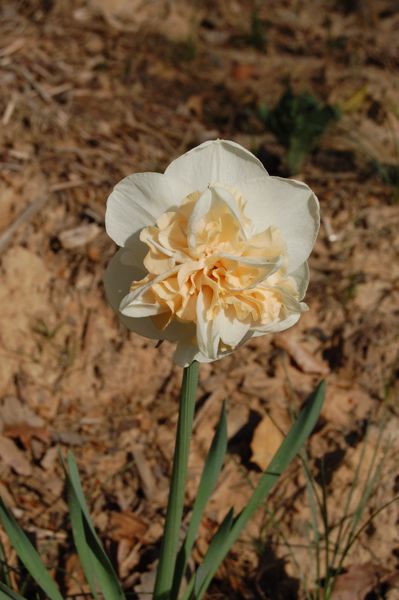
The purple Iris shown here are happily growing in my garden, my Mother sent them to me from her garden in Iowa and before that they were in her Mother's garden.  I think Iris are incredibly beautiful flowers and there are so many varieties out there that no matter what color you like you could probably find some to please you.

Since I started beading Iris have shown up in several of my pieces and I am sure that like other flowers will continue to show up.

The first beaded piece I made that used the Iris is my necklace below.  I made it for a contest at Turquoise String Beads in Fall River, Massachusetts where I got my beading start.  They were having a summer themed contest and I designed this piece for it.


After I started doing bead embroidery I knew that I absolutely had to make an Iris piece.  Even with size 15/0 beads (which are quite small); I knew that the piece would have to be fairly large to get the details that I wanted.  I had this purse that gotten at a charity sale and realized that it would be the perfect canvas.  With lots of photos of Iris in hand I played with ideas until I came up with what I wanted.


I used 50 colors of seed beads for the purse to allow me as much freedom with values as possible.  The Iris has some ruffled edges to the petal which helps give dimension to the flower.  This purse is still one of my favorite pieces that I have made.


My pond piece was inspired by some Iris we saw in a little pond when we were hiking  in New England.  I mad this piece to enter into the Bead Dreams contest for their crystal category.  The Iris in this piece is entirely 3-dimensional and was added after it was made.

At Bead Fest in Philly last year I took a Mini Mosaics class from Joan Babcock.   In class we learned how to make mosaic pendants using seed beads instead of tiles.  I loved the idea, how cool and "what if...."

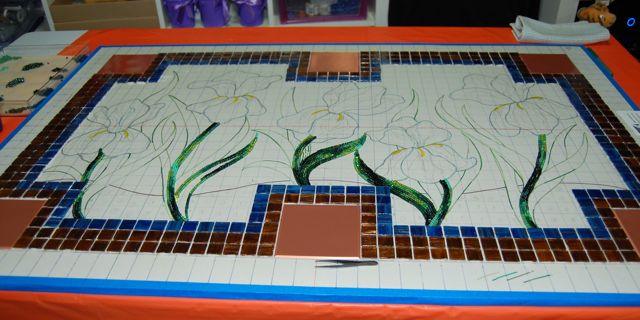
Oh how I love the "what if"s,  when my creative brain slams in to high gear and takes me for a ride.  What could you do with this technique only bigger?  A mirror frame?  A piece of wall art?  Or how about a backsplash for behind our cooktop in our kitchen?  Mmmmmm......  I like that idea.  We didn't have our builder put in a backsplash because we didn't like any of their options, we wanted something more interesting.  I had been trying to think of a really cool idea for over the cooktop and then we were going to use that to pick the rest of the backsplash for the kitchen.

Since we weren't in a huge hurry I could take on this project which I knew would be a big undertaking.  The project started with measurements and a to scale drawing so I would have an idea of what I wanted to do.  Hmmmm.... what did I want to do?   At this point we had already painted the kitchen blue and copper.  Nature has always been my go to inspiration and the idea of using Iris just jumped out as an image that we would enjoy year round and could pick up on the blues and coppers in the room.

The scale drawing was a rough idea and gave me an idea if I could make it work and what I wanted to use and to see what Wayne thought since as always he was funding the project (luckily he doesn't have to pay me by the hour).

The photo above has the drawing that is sitting on top of the substrate that I am using for the mosaic.  I will leave you with this and continue with the project in my next post.  If you can't wait you can check out the photo album of this on my facebook page.

Tuesday, May 10, 2011

Spring Gardening

Wayne digging holes for trees from Maryland DNR
Some of our first bulbs to come up from fall planting.
 Although I had realized I had been very lax in writing my blog I hadn't realized that I hadn't written anything about gardening this spring.  Kind of funny when I think about the amount of time and work we have been putting into changing our yard and the amount of fun we have had watching all of our plants come up and come to life.

We ordered 50 trees from Maryland Department of Natural Resources  and they sent us a few extra so we ended up planting 55 trees and giving 3 to our neighbor.  We ordered half redbuds and half black locust.  These trees were in better shape and bigger than the ones we had gotten from the National Arbor Society in the fall.  I had dug over half of the holes before the trees arrived and in 2 days we dug the rest of the holes and planted all 55 trees.  So far they are doing pretty well although I am going to have to spray for bugs since they think the trees taste yummy.


As winter was ending and spring neared we got our first colorful visitors with the crocus starting off the show.  I was so excited I had to text Wayne to let him know we had our first flower open.

Baby Iris and Crocus, so cute and very welcome color.


More baby Iris, less than 6 inches tall.

More bulbs coming up and blooming.
A real treat for me was when the baby Iris started showing up with the crocus,  These tiny wonders were a real treat so early in the year.

We planted over 1000 bulbs in the fall and it was really exciting to see them starting to come up and we were out many days looking to see what had changed and who was blooming.
Daffodils in bloom.
Our first lilacs in bloom.
I was really excited when my two Korean Lilacs bloomed this spring,  I have always loved lilacs since we used to visit my Grandmother Throne and she had huge lilac bushes in bloom, the smell was heavenly.  Some of my other bushes planted in the fall were lilacs but they did not bloom this spring.

Pretty Double Daffodil.
Seeds from Grandma's Hollyhocks a few generations later.


As we have spent all of this time planning and planting our garden I have thought a lot about the females in my family who were gardeners and how proud they would be of me.  I have especially thought of my Mom and my Grandma Throne.  My Mom sent me 3 boxes of plants from Iowa including tulips, iris, seeds from my Grandma's hollyhocks and cuttings from her peonies.  I like that these plants will be in my garden where they can remind me of her.  The lilacs and redbuds that we planted will also remind me of my Grandmother since she loved them as well.

Wayne's Anniversary Present to me, Roses and Daylilies.
Not too bad for $5 rose bushes, cheaper than cut roses and last longer, too.
First Iowa Iris to bloom (the day after our anniversary)
Second Iowa Iris to bloom.
Some of the newest additions to our yard are these roses and daylilies that I bought on or wedding anniversary at Lowe's, this grouping of plants cost $15.  I LOVE clearance and sale plants at Lowes.  I told Wayne he was very smart to buy me roses that would come back year after year, much better than ones that will die in a week or so.


I will leave you with these beautiful Iris in bloom,  they bloomed the 2 days after our anniversary,  I really like that Iris (one of my favorite flowers) bloom around our anniversary here in Maryland.  And these came all of the way from Iowa to grace us with their beauty.  If you like Iris come back for my next post which will have Iris coming into our home decor.