Monday, December 13, 2010

Colors of Fall

If you have been following my blog you know that a little over a year ago Artbeads.com chose me to be one of their Design Partners that review their products and make pieces using them.  If you have not had the chance you should check out their facebook page and their online galleries.  They have some very talented designers who cover a range of styles and techniques.
This calender year they have been going with a seasonal theme for each of the projects and this one is the fall theme.  I finished my piece a few weeks ago but hadn't gotten around to blogging about it.  I got a bit overwhelmed trying to get ready for Christmas since I had decided to spend from the 30th of November until the 21st of December at Iowa with my folks.  I will be home just over a week and then off to Wayne's folks for New Year's and his Dad's Birthday.  Trying to get handmade cards made and ready to go out, planting and Christmas shopping took up all of my available time and head space.
 So here it is a bit late but it is done and turned out very much like I planned.  The photo above is the beads I requested.  One of the challenges of doing this is trying to figure out what beads will work best for the project and how many you need, but WOW is it fun looking through their website and trying to figure it out.  I love being able to try new types and colors of glass beads and working with different pendants.  They have soooooo many beautiful products.   When they said that it was a fall theme I immediately remembered seeing their selection of copper leaf pendents.  I have really been enjoying working with copper lately and couldn't resist this beautiful leaf.

But how to showcase the pendant and really show the richness of the "Colors
of Fall"? Finally I decided on going with an embellished spiral rope. This gave me a lot of leeway on how to make the piece with all of the wonderful intensity of fall.
The first photo show the selection I chose although the copper wire is not in the photo.  The second photo shows the spiral rope.  The sides of the rope include the 4mm Jet Picasso Matte fire-polished beads as the accent bead.  I didn't include them in the center section because they would later be hidden.  I have really fallen in love with the different finishes on the Czech beads and must admit that Jet Picasso is a favorite (in different sizes and shapes it is always yummy).
Here you can see the spiral rope after it has been embellished.  I used Toho 8/0 Hybrid seed beads in Apollo to embellish along the sides.  They looked really neat on the website (kind of coppery) but in really life I love them even more.  They have a transparent glass with a metallic copper finish that from some angles almost make them look like copper beads but they are so much more exciting than that.  In the center section of the necklace I used various fringing techniques to embellish the spiral rope.
In this close up you can see some of the beads better.  With a mix of seed beads, the Red, Black, and White Porohyr, 3x2mm Orange mix Picasso Roundelles,  and 5x4mm Autumn Mix Roundelles.   I took the copper wire and spiraled that around the center section of the necklace blending the copper of the leaf into the copper of the wire and up toward the coppery Apollo beads. The copper pendant is hanging from the copper wire spiral and can be removed so that the necklace is more versatile. I also used the copper wire to make clasps for the necklace and one of the bracelets as well as for the main part of the earrings.
I used some of my left over beads with more supplements from my collection to make a pair of earrings as well as two bracelets that I could wear with the necklace.  Making my own ear wires was a first for me as was using wire to make toggle clasps and I love how they turned out.  None of them take much wire and are very cost effective and they can be customized to go with the jewelry.
In these last 2 closeups you can see the copper spiral better as well as the beads and the copper pendent.  The over all piece is a bit darker than I had originally planned up I love how it turned out and how rich it looks.

Disclosure...As a reviewer of products at Artbeads.com, I receive the Copper pendant and Glass Beads above free of charge. I have been asked to review these products and give my honest opinion of the products...positive or negative. I am not being compensated by Artbeads.com for my endorsement as it pertains to the products received and reviewed.

Sunday, December 12, 2010

Grow where you are planted: part 2

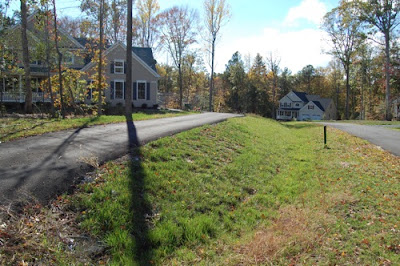
Here you can see as you come up the drive way (did I ever mention that we got a nice paved driveway early this summer?).  This is photo is another partially before photo although you can see where I have been doing some digging to the left of the photo.
Although I think that you are supposed to have a plan for your garden before you start we haven't really been doing that too much, it has been more of a what next and hope that it all works out OK in the end.  Here you can see the driveway better and the nice bank down to the ditch that is very boring here.


Wow somebody has been digging lots of wholes in the yard, I am thinking some seriously big moles.  Trees bushes and 100 or so bulbs are going here (the bulbs are in we are still waiting for the National Arbor Society to deliver the baby trees and bushes.
You can also see the grasses that we moved from where the builder had put them in the front yard to the side of the driveway.
Here is a picture of my favorite garden gnome (isn't he cute).  I started the gardening project but he started helping and with the 2 of us we got a lot more done more quickly.
You can also see another section that we dug up and planted.  This area has more bulbs, asters, and a variety of plants that Mom sent us.
More asters, bulbs, iris, lilies and a Korean lilac (I love sales at Lowe's).
 
I will leave you with this final photo of a fall mum that was blooming as I left for Iowa shortly after Thanksgiving.  We planted close to 1000 bulbs, 8 or so bushes, iris, lilies, pansies, mums, peonies and several other flowers this fall.  We are still waiting for the arrival of 11 trees and 14 bushes that we have the wholes dug for.  I am hoping that I will be able to update you in the spring with lots of photos of flowers blooming and plants happily taking off.

Wednesday, December 8, 2010

Grow where you are planted


As I write this I am in Iowa and enjoying spending time with my folks and looking forward to this upcoming weekend when we will be celebrating Christmas and the 40th Anniversary of Mom adopting the 3 of us kids.  I can't imagine 2 weeks before Christmas suddenly have  a 1,2, and 3 year old.  Tomorrow Betsy and David, my husband Wayne and Chris should all arrive.  Will be the first time in a while that we have all been here together (usually Wayne is missing because of deployments or such).

I thought I would try to spend a little of my time here trying to catch up a little bit on my blogging which is so far behind as to be ridiculous.  I apologise to those who like to keep up with what is going on in my life. 

This fall Wayne and I have been putting some time into trying to get a start on the landscaping for the house.  The builders put in some plants and we got to keep some of the trees in front and back but we want to give the place personality and as we should be living in the house for quite a while we finally have a chance to put in flowers I have wanted to add for years.  The photo above is one of the 3 boxes of flowers and bulbs that my Mom sent to us.  Some of the plants are cuttings from plants that were my Grandma's and the rest are from Mom's garden which means there will be flowers from 3 generations of the women in our family.

A serious challenge to our yard is that the soil is clay and in the spring they had heavy machinery on it  grading, add the drought we had this summer and the soil is seriously compacted and hard to work so anywhere we wanted plants we had to dig it up and loosen it up before adding some real dirt to it.  This second photo shows one of the sections I had been working on.  The original plan wasn't near this ambitious but we just kept adding and adding......
This was the first area I dug up and planted.  It is in front of our trees in the front yard.  I planted mums, nandina (heavenly bamboo), pansies and violas as well as close to 300 bulbs.  We are hoping that everything will take off and we will have a nice area in the front .
We kept going back to Lowe's (we should buy stock we shop there so much) to get more dirt and plants etc for our growing fall project.  One advantage to this is that we manage to get plants that they were getting rid of and paying 25-75% less was very helpful and allowed us to buy more plants than we otherwise would of.  The 3 bushes above will hopefully grow into a sort of hedge between the neighbors side yard and ours.  It is a big empty space that the grass didn't really take well on so it can use something interesting.
This photo is partially here as a before photo since the builders put this area in, I added the Asiatic lilies and pansies to it but later you will see what we added.
Here is the area you saw in the 2nd photo once it has been worked more and plants and bulbs put in.  The only this you can see here above ground is the 2 bushes (more sale prices at Lowe's) but there are also many more bulbs under the ground just waiting for spring to come (at least we hope).

In part 2 I will include more photos and more of what we planted.

Friday, June 25, 2010

Summertime: Part 2

As I promised here you get to see how my "Summertime" piece for my review for Artbeads.com came out.  Above you can see it after I used wire to attach the sections together and added beads to the outside edges of the pieces (this also covered up the wrapping that joined the sections).
The neck section is made up one length of chain and one of links of the 9 x 6 mm roundelles and some of the smaller beads.  I had enough of these to also make a bracelet and earrings that coordinate with the necklace.
A close up of the necklace on the white allows you to see some of the details like the wraps around the edges better.  All of the colors of the Glass Beads that I chose really ended up working well and there are some I am going to have to get more of,  I am thinking that maybe I will have to combine some of them with sea glass.  (If you would like to see the necklace I made with sea glass please visit my Face book page.)
The bracelet really allows you to see how truly interesting the Roundelles are,  very cool.  I ended up with 2 strands of links and 1 of chain for the bracelet.

I used some chandelier findings that I had and used some of the last of the Czech beads that I had left to make the earrings.
Here you can see all of all three pieces as they are laying flat,  you can see the back of the necklace this way.  I am really happy with how this piece turned out and Wayne says that he really likes the pieces that I have been working on lately with this technique of wire and beads together.  And to think it all started with a class to learn the technique and the inspiration of the Swarovski Seashell Pendent.


Disclosure...As a reviewer of products at Artbeads.com, I receive the Swarovski crystal pendant and Glass Beads above free of charge. I have been asked to review these products and give my honest opinion of the products...positive or negative. I am not being compensated by Artbeads.com for my endorsement as it pertains to the products received and reviewed.

Thursday, June 24, 2010

Summertime

It is that time again.  Another opportunity to review products for  Artbeads.com.  I have really been enjoying this as it has allowed me to try things that are new to me but also it has challenged me to come up with jewelry using different products.  This time our theme was "summertime" and we had the choice of products in the Glass beads, Pendents and Charms categories.  You could give me glass beads any time since it s a broad category and there are sooooo many wonderful choices in there.

 I got my e-mail shortly after having returned from Wire Fest in Philly and having taken a class from Dallas Lovett that includes both wire and beads that I just adored.  I came away from that class inspired to play more with the idea of combining beads and wire; that inspiration is coming into fruition in two pieces, this happens to be the first one I have finished.

After spending hours looking at Artbead.com's website and trying to figure out how I wanted to interpret "Summertime" I narrowed it down to using the Swarovski Shell pendent as my focal and working from there.  Beach, ocean, and shells; they all feel summery to me.  I decided to go with blues and beiges to bring out the colors of the water and sand.  The photo above is my original sketch.

One of the most exciting moments for me is when the beads arrive.  It is a combination of looking at all of the new gorgeous beads and know that it is time to make my ideas come to life.  What will it look like when I finish it?  Will it have the look, the feel the energy that I am striving for?
Here you can see all the beads laid out.  Mmmm, yummy makes me want to head to the beach.  The Swarovski Seashell pendent in Crystal AB was everything I could hope for.  It picks up the blues and the beiges depending on the angle of the light reflecting off of it.  I chose TOHO seed beads in 11/0s, 8/0s and 6/0s.  In colors like Matte Apollo, Stone Blue, and Matte Natural Picasso all of my colors were everything I could have wanted and more.  I also chose 3 mm and 4 mm Czech Fire-polished crystals,  choosing only 2 of each size was really challenging even knowing I was going for blues and beiges.  The Blue Tiger's Eye and the Crystal Picasso ended up being my favorites.  And last but not least were the 9 x 6 mm Roundelles in Yellow and Cobalt blue both with a Full Picasso finish, both were to die for.
Besides a drawing as a guide and piles of beads this project also needed another really important item.  Wire.  I chose to go with Sterling Silver in 20 and 26 gauges.  One of the things I really like with pieces like this is the challenge of figuring out how to execute them.  How to turn a sketch and piles of beads into the vision I have for the piece.  The photo above is the first step in making it happen,  this will become the center of the piece.
Here you can see the center section finished.  You can see how the seashell is looking more yellow than in the earlier photo of it.  I think I may have to make another necklace with just this center section as the focal,  you could use any pendent you want in it and have a really nice piece.
The first of the two side shells starts here,  figuring out what beads to use and in what order is part of the fun here,  Using the largest beads along the outside edge of the curve allows the beads to follow the curve without needing partial rows or gaps between rows.  
This gives you an idea of where the piece is headed.  I made each of the sections separately because this would make it easier to work on.  The biggest challenge of working on this type of project is to keep from tangling the wire on things or poking yourself with it.
Here we have the first of the side shells.  It was an unexpected benefit that you can see both a shell and an ocean wave cresting in it. And this is where I will leave you for the day.  What will the piece look like when all of the part are finished and put together?  Will it seem like "Summertime"?


Disclosure...As a reviewer of products at Artbeads.com, I receive the Swarovski crystal pendant and Glass Beads above free of charge. I have been asked to review these products and give my honest opinion of the products...positive or negative. I am not being compensated by Artbeads.com for my endorsement as it pertains to the products received and reviewed.

Tuesday, June 22, 2010

Catching Up With Life

I swear it feels like all I do is try to catch up with my life,  I am so far behind on so many things that my To-Do lists have to-do lists.  I can't seem to get really focused on anything so am doing a lot of bouncing around on projects for the house and creatively.  At this point all of our stuff is out of storage although plenty of it is still in boxes.  The photo above is my studio in mid April after the move but before some of the new additions to the room.
Memorial Day weekend we rented a cargo van and headed up to College Park and hit the Ikea.  I had been wanting to go for a while but timing had never worked out.  For our 20th Anniversary at the beginning of the month that is what I told Wayne I wanted (to go to Ikea before he headed off fishing with some of the men in his family).  We spent the weekend  building furniture (about 1500 lbs worth).  This photo does not include everything we got.
These are my new blue bookcases,  they go well with the blue wall across the room from them as well as the blue ceiling fan.  They are no longer near this empty. We got 2 of these for the Office although those aren't built yet.

This is the new Expedit desk and shelves.  I got another unit like the one on the left for the other side of this wall as well as 2 of them for our master bedroom.  They are pretty cost effective and have lots of space for books, art supplies and bears.
Yes the couch is still in my studio,  will figure out what kind of nesting chair I want to put in my studio once we finally get the great room finished and the couch where it belongs.  You can see my new desk for creating behind it.  Now I have 2 big work tables to create on.  The top is a beech countertop that I still need to oil or otherwise finish.  You can also see that some of the stuffed animals were quick to find homes on the new shelves.
While Wayne was gone for 10 days you would think that I spent most of my time getting my studio organized and I did a bit but I spent more time on a couple of other projects that I knew needed getting done.  I managed to finish painting the last of the base moulding and almost all of the crown moulding for the great room while he was gone.  The photo is of some of the crown moulding which is red with a copper paint accent.  3 coats of each color on 8 pieces meant it took a bit of time, but I can't wait to see how it looks like up.  The only thing we need to paint yet is the corner pieces but Wayne needs to do something to them before I can paint them.
The other big project I tackled while he was gone was the Master Suite.  I was getting tired of the clutter everywhere and boxes and........   So the new Expedit shelves went in and I completely rearranged it, including moving the bed on angle to the room.  There are still project to be done but it feels much calmer since it is less jumbled.  I like the bed on the angle since when you walk into the room you can see so much of the hardwood floors showing.
I also got my Sacred Space up in our bedroom.  The table contains a lot of my treasures that I collect here and there.  Some are pieces of the world around me that I have picked up, some are pieces of my art and a few are pieces of art and odd bits that I like.  The piece on the wall is one of my newer finished pieces.   It is my Zentangle Dragonfly, if you want to read a bit about it I included some of that in my BJP blog.  I will try to write a post later about how I finished it.  At this point I am planning on adding my 2010 BJP piece to this wall as well once it is finished.  I have added candles to the table and I want to make it more stair step so that things are easier to see.
Since Wayne has been home he has put up the ceiling fan in the great room and we spent all day on Sunday trying to get the basement organized.  Before Wayne can do most of what needs doing in the great room he needed his table saw up and running and to be able to work down there.  The basement is the general storage area and looked like a cardboard factory had blown up down there.  It isn't completely organized yet but like things are together and most of the boxes are unpacked.

I was hoping that we would be able to work on the great room this upcoming weekend but think the time may end up going to Wayne's car since it has been acting up,  may need some transmission work.  If so sounds like I even get to help some (I am sooooo excited).

The projects around the house are coming along but it will be a work in progress for a while.  With unlimited budget, energy and time we would be further along but I love how it is coming along and it is showing our personalities.  It will be a one of a kind, no doubts.   If you would like to see more photos remember we have the Web Gallery that has more photos.

Also if you are interested I am on Facebook now.  I play games too much but I do put short updates on some of the things I am up to there.

Sunday, April 25, 2010

The Beauty of Spring: Part 2

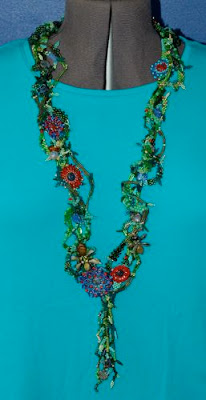
As I promised here is my finished lariat made from my Glass Beads from Artbeads.com.  I reviewed them in my last post here.  I started out by making the bees and the flowers and then it was time to make all of the vines full of the many shades and colors of green that show up in the spring.

I worked on this piece as I found time an energy from late February when I received the beads until the 8th of April when I finished it just in time to where it while I was attending Wire Fest in Philly.  I got a lot of comments on the piece and figured out that I needed to do a tiny bit of tweaking since the way the piece sat when flat was different than when it was being worn and my bees need further anchoring.

I really enjoyed working with all of the beads that I received and think that the bead mixes are indeed a great way to get the different sizes you need for a freeform peyote piece.  I may have to play some more with free form peyote, maybe developing a class to teach how to make a bracelet or something.


I felt very springy wearing my new piece and and it works well with my general style for my work which tends to be fairly organic and inspired for nature.
Once again my dress form gets put to use with my jewelry.  It works great to photograph my larger/longer pieces as well as giving me a place to work on the larger pieces that I want to conform to the bodies shape.

I had to include this last photo which show the fact that I ended up with some beads left but not lots.  I was unsure how many packages of the mixes to get and although I could have added more to my lariat to use up even more than I did I stopped when the piece felt finished.  I am really impressed that I didn't end up with that much left over.  I think those 2 extra wings might have to go onto an angel for my studio.

Disclosure...As a reviewer of products at Artbeads.com, I receive the Glass Bead elements above free of charge. I have been asked to review these products and give my honest opinion of the products...positive or negative. I am not being compensated by Artbeads.com for my endorsement as it pertains to the products received and reviewed.

Friday, April 23, 2010

The Beauty of Spring

In February Artbeads.com contacted me for  the next installment of Blogging for Beads.  They had decided to go for the theme "The Beauty of Spring"  We could choose any types of beads to review with the object of making a piece or pieces with spring as our theme.  I tossed around lots of ideas and although I knew that I was going to have a super busy next month or two I decide to go for a more time consuming project.

While I was sketching out some ideas to figure out what I wanted to do Wayne thought since I had been putting butterflies and especially dragonflies in my work that I should include some bees in this piece.  I also wanted to use only the stuff that I got from Artbeads.com except for the thread which I always have plenty of.

From the beads that I got with my previous shipment my review mentioned that I thought that the bead mixes from Toho would be so cool to do a freeform peyote necklace out of so I decided to do a vine necklace with flowers and some bees made out of glass beads.  Then came the challenge figuring out what beads would make my "vision" come to life.  How many packages of mixes, what kind of beads to use for the flowers and how to make the bees and what glass beads would work best to combine to make a bee. I must admit surfing through all of the glass beads going back and forth and looking at all of the cool beads was fun.

I ended up using a little wire to make the bees since this allowed me to give them shape but also to give them antenna.  The first bee (on the left) is made from a 9 x 6 mm Opaque Jet Black w/ Half Picasso Roundelle for the head, 4- 15 x 6 mm Jet/Picasso Daggers for the wings and a 11 x 9 mm Wasabi w/ Picasso Spots Oval for the body. This is my favorite of the bees and I love all of the beads that he uses although I really think the wings are just way too cool.  I also got these to use on my 2010 BJP pieces with my last selection and they show up in my January BJP block.

 The second bee has a 10 mm Wasabi with Picasso Spots Lentil, 4- 18 x 8 mm Topaz Duckbill beads and a Czech Glass Brown Mix w/ Blue Picasso Oval.  This one looks most like a bumble bee and is probably the most bee like.  I love the stripes on the body bead.  The shape of the duckbill beads is interesting and I think they could be fun to experiment with.

The last of the 3 bees uses a Czech Glass 8 mm Coin Green Stone, Czech Glass Amber with Gold Luster Small Spades for the wings and an 11 x 9 mm Matte Crystal w Picasso Oval.  I had gotten 4 beads of the wings of each of the bees but for this small guy I couldn't figure out how to make the four wings fit so he only got two wings.  I think the small spades would make great angel wings.

These are the beads that I got for the flowers.  I got Blue Silk/ Picasso and Blue/ Jet Silk flowers to use as well as 10 mm lentils in Blue Silk w/ Picasso and Red w/ Light Picasso to be the center of 5 more flowers that I was going to use a combination of brick stitch and netting to make the "petals" of.  For the petals of the flowers I got Toho bead mixes in Reds/Ambers and Blue Water.  I have some of the flower beads and lentils to use in my BJP pieces although some of the colors are different.  Both shapes would work well with lots of different types of projects and are available in lots of interesting colors.
And here you can see what that pile of lentils and mixes turned into with some stitching.  There weren't that many seed beads left and those got thrown into the mixes for the vines.  The great things was that these were fun and quick to make.  I think that some of them would make neat earrings.
Here is a photo of the Spring Apples mix of beads,  it was my favorite of the vine mixes and pouring out the 10 packages made just a yummy springy mix that was inspiring all on it's own.
To make my life a bit simpler while doing the free form peyote stitch I separated the Toho mixes in the  Spring Apples, Mint/Forest and Forest Green into the different sizes of beads. (Yes I am a bit obsessive at times.) You can see the piles of 8/0, 11/0, 15/0 and bugles in their tray and the very beginning of the lariat that I would be making.
These last 2 photos show the beginning stages of the lariat.  This was my first attempt at free-form peyote and although like any peyote project it took a fair amount of hours to do the piece I found it amazingly relaxing.  I think that part of that was that it was my only creative project for the month and because it was for me a fun project that I just made decisions as I went going "where to now" and knowing that there were no wrong answers.  I will post the finish project in a couple of days.


Disclosure...As a reviewer of products at Artbeads.com, I receive the Glass Bead elements above free of charge. I have been asked to review these products and give my honest opinion of the products...positive or negative. I am not being compensated by Artbeads.com for my endorsement as it pertains to the products received and reviewed.