Showing posts with label Making a Home. Show all posts

Wednesday, August 31, 2011

What a Week It Has Been

Pile of tree trunk usable for firewood
 After the east coast all shook from the strongest earthquake to hit the area in over 100 years, life felt a bit shaky.  In ways I was glad that I had lived in multiple places that had earthquakes so that I was not nearly as shaken as many people seemed to be.  It was still one of the stronger quakes I had experienced but we were lucky that we didn't have any damage, not even any photos knocked off the walls.  It is nice to say it would have been better to have Wayne home rather than off in Florida for work but he would have been at work anyway so it wouldn't have made much difference.

When I went out to check on the outside of the house the neighbors had a tree guy at their house giving them an estimate on how much it would cost to take down their 3 dead trees.  I went across and talked to the man and since they were going to be in the area they could take our dead Tulip popular the same day.  Seemed like a good idea especially with a hurricane predicted to come up the east coast.
Light colored chips from our Tulip Popular as well as the neighbors.
They came on Thursday and took down our tree and the neighbors' three.  It was really cool to watch since I had never seen anything like it.  We ended up with a bunch of logs that can be used for firewood and a large pile of chips that we will use for mulch since with all of the gardening we have done we need lots and lots of mulch.

One of the 5 trees our next door neighbors lost,  this is one way to get a pond in your back yard.
 As if an earthquake and getting a tree taken down wouldn't have made an interesting enough week we got 2 1/2 inches of rain on Thursday night and had hurricane Irene headed our way.  I spent time trying to get ready for the storm.  We started getting rain very early on Saturday and by early afternoon had 2 1/2 inches and the brunt of the storm had yet to hit.  At 6:30 pm I lost power so I spent the evening listening to the storm.  Candles came in handy but even better were the LED lamps that I had that were battery operated and worked good for reading by.  Watching the wind come down and the wind whipping the trees around was amazing.  I was so glad we were not getting the worse of it and even more glad that I was in my nice snug house.
Here you can see 2 of the big oaks our neighbors lost (photo from our back yard.)
 The rain ended by morning (the rain gauge was completely full with another 7 inches) and then it was time to see what damage had been done and then to help people get trees off of driveways and make sure everyone was OK.  Our next door neighbors lost 5 trees and have at least a couple more that are seriously listing.  Luckily they did not fall on anyones house but it did take a crew of us to get all of the branches etc that had fallen onto the driveways of the neighbors behind them.
One of our baby trees that need to be propped back up.
 I was really lucky that we did not loose any trees although several of the baby trees we planted in the spring will need to be propped back up and probably staked until they can get their footing back.  Some of them are damaged with some splitting and damaged bark but hopefully we won't lose any of them.
Just some of the wood our neighbor Scott is adding to his wood pile.  He is going to have plenty.
 With all of the damage, it is amazing we came out as well as we did.  Some of the immediate neighbors had damaged fences, decks and even roofs and water damage.  Even then we didn't get hit near as hard as other areas of Southern Maryland.
More of the fallen trees.
 I had to do without power until Monday afternoon but I could still text Wayne to keep him updated by how I was.  We had water the whole time which was good even though had to be careful not to overflow the septic catchment since the pump to get rid of it is electric.
Still have trunks that will eventually need to be cut up and moved.
 I still have friends both locally and in New England that don't have power yet.  The bead store I teach at just got it today.  I think Trish is open partially because she doesn't have power at home yet.
Now the driveways will be passable.
I can't believe Wayne has missed the most exciting week we have had here in Southern Maryland in a long time.  I think if we would have had lots of damage I would have been more unhappy about him being gone but as a Nay Wife I learned that if something is going to go wrong or happen it will probably be when he is gone.
After the tree was removed from the edge of the deck.
 Overall I feel amazingly blessed that we came out of all of this in such good shape.  My thoughts and prayers go out to all of those who were not near so lucky.  My thanks go to all of those who checked in on me and offered their assistance if I needed it.
Another view of the cleared driveways and trunks of the fallen trees.
 What do you do when you have no electricity for almost 2 days.  When it was really dark I mostly read but during the day besides helping out lugging branches off of driveways and into the woods, I organized my studio some and worked on my backsplash mosaic.  So my time wasn't a total loss.
Fallen branches and trees took out and damaged sections of their new fence.
 The good news is that behind the storm came some glorious weather with highs in the low 80's and lows in the low 60's so the house didn't become a sweat box.  A couple of the neighbors had generators before the storm hit and by the time we got electricity back quite a few more got them as Lowes got a shipment in at some point.
Hard to see but the tree leaning against the right side of the roof damaged the roof and caused water damage inside.
I am hoping that September will be a much quieter month, Wayne will come home on Friday night (for Labor Day weekend and then be home for a week or so before he makes another trip and in the middle of the month I will have a trip to get together with several other wives that we were stationed with in Hawaii.  Still sounds much quieter than the last week.

Thursday, May 19, 2011

Iris Backsplash: In the Beginning

When I  left you in the last post you knew that Iris were my inspiration for the backsplash that I was going to make for behind the cooktop in our kitchen.  One of the first jobs after we decided this project was a go was to make up the substrate for the piece,  the picture above has it cut to size.  Our first purchase was trim to go around the edge so that the piece could be attached (and removed) from the wall and the trim will cover the screws.  I wanted to use some tiles around the edges to help frame up the piece so they were the next decision and purchase.  You can see the metal tiles sitting in the middle of the background.  I marked up approximately where the trim and tiles would go so that I could figure out where the Iris would go.

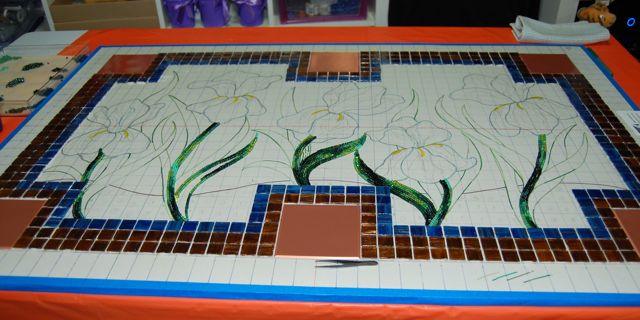
In this photo I have roughed in where the flowers would be going (you can click on the photo and it should show it larger).  I used the original scale drawing as a general guideline but since the tile is different than the original vague ideas I made adjustments.  You can also see the grid that I sketched on to make placement easier and which I used to help figure out how many square inches of bead I was going to need to order.

I used mastic (tile glue) to glue down all of the metal and glass tiles.  If you look closely at the top center you can see where I ran 2 short of the blue tile.  Something else will be added there later.

In this picture you can see where I have taken my rough sketch and firmed and cleaned up the idea and then used markers to outline the areas.  Wayne suggested adding more leaves so there would be less background so instead of 2 leaves the flowers now have 3-4 leaves each.  I used  this to try to figure out approximately how many seed beads to buy (more guess than not).

Wow,  I ended up with a 7 pound box that was mostly seed beads for my mosaic and the big question was; would this be enough?  Enough or not it sure was fun opening the box. I had a couple of colors that were backordered so would have to start on something that didn't require them.

And then it was time to start I put all of the values and shapes of green beads out on a tray and it was time to start playing.  As you see these photos realize that each bead is added by tweezers one bead at a time.  I tried using my fingers but even using the larger 6/0 seed beads my fingers just got in the way.  Even doing this with tweezers it has gone faster than I expected it to.

I started the greens by doing each of the stems first and then added leaves here and there working back and forth across the piece.  Doing this way had two goals; the first was that since I had pulled some beads from my collection that were the correct size but that I didn't have a lot of I didn't want them to end up in all in one flower and that as I worked at different times how I approached the values varied and I didn't want that to show up.

I generally approached the leaves by doing the outside edges first,  this gave them fairly smooth lines along the outside,  I also chose the leaves that were in front to do first, hoping to use value and such to separate the  front and back leaves.

Here you can see a bit more of the value changes and  the different shapes, values, and finishes on the beads.

Here is where the leaves stand at this point, the disadvantage to guesstimating the amount of beads that I needed was that I ran out of some of my values of green beads and will need to order more,  not sure how I got it so wrong (wonder if I figured out how many before I added the extra leaves).  I am waiting to order more beads until I figure out if I just went wrong on the green or not.  The hour count on the leaves at this point is 19.  I have been tending to work using quarter hour segments so that I can keep track of the beaded part of the project.  The little dots on the bottom are copper leaf beads that you will see better when we add the dirt next time.

Tuesday, May 17, 2011

Iris as Inspiration

As I got ready to start blogging about my newest really big project I realized that I wanted to show some of the background of how Iris have inspired some of my previous pieces of art.

The purple Iris shown here are happily growing in my garden, my Mother sent them to me from her garden in Iowa and before that they were in her Mother's garden.  I think Iris are incredibly beautiful flowers and there are so many varieties out there that no matter what color you like you could probably find some to please you.

Since I started beading Iris have shown up in several of my pieces and I am sure that like other flowers will continue to show up.

The first beaded piece I made that used the Iris is my necklace below.  I made it for a contest at Turquoise String Beads in Fall River, Massachusetts where I got my beading start.  They were having a summer themed contest and I designed this piece for it.


After I started doing bead embroidery I knew that I absolutely had to make an Iris piece.  Even with size 15/0 beads (which are quite small); I knew that the piece would have to be fairly large to get the details that I wanted.  I had this purse that gotten at a charity sale and realized that it would be the perfect canvas.  With lots of photos of Iris in hand I played with ideas until I came up with what I wanted.


I used 50 colors of seed beads for the purse to allow me as much freedom with values as possible.  The Iris has some ruffled edges to the petal which helps give dimension to the flower.  This purse is still one of my favorite pieces that I have made.


My pond piece was inspired by some Iris we saw in a little pond when we were hiking  in New England.  I mad this piece to enter into the Bead Dreams contest for their crystal category.  The Iris in this piece is entirely 3-dimensional and was added after it was made.

At Bead Fest in Philly last year I took a Mini Mosaics class from Joan Babcock.   In class we learned how to make mosaic pendants using seed beads instead of tiles.  I loved the idea, how cool and "what if...."

Oh how I love the "what if"s,  when my creative brain slams in to high gear and takes me for a ride.  What could you do with this technique only bigger?  A mirror frame?  A piece of wall art?  Or how about a backsplash for behind our cooktop in our kitchen?  Mmmmmm......  I like that idea.  We didn't have our builder put in a backsplash because we didn't like any of their options, we wanted something more interesting.  I had been trying to think of a really cool idea for over the cooktop and then we were going to use that to pick the rest of the backsplash for the kitchen.

Since we weren't in a huge hurry I could take on this project which I knew would be a big undertaking.  The project started with measurements and a to scale drawing so I would have an idea of what I wanted to do.  Hmmmm.... what did I want to do?   At this point we had already painted the kitchen blue and copper.  Nature has always been my go to inspiration and the idea of using Iris just jumped out as an image that we would enjoy year round and could pick up on the blues and coppers in the room.

The scale drawing was a rough idea and gave me an idea if I could make it work and what I wanted to use and to see what Wayne thought since as always he was funding the project (luckily he doesn't have to pay me by the hour).

The photo above has the drawing that is sitting on top of the substrate that I am using for the mosaic.  I will leave you with this and continue with the project in my next post.  If you can't wait you can check out the photo album of this on my facebook page.

Monday, March 7, 2011

A Color Bomb Goes Off

It seems that I can't be happy without lots of color in our life, in this case I am using up some of the color we already had.  I had planned for the hallways on the first floor to be purple but which purple ended up changing.  the original idea was for the paler purple that we used in our bedroom but Wayne thought that was too light so when it finally came down to time to paint these spaces instead of choosing to use one color and needing to buy more paint I decided to go with multiple values that we already had, much more fun.  3 values of purple are used between the hallway and the one story parts of the foyer.  Color me a very happy girl!
Here You can see the Wood Violet the lightest of the three value which I used in the hallway between the dining room and kitchen and from the pantry to the foyer.  Lots of doorways and walls, this part alone took me a weekend to paint, not including taping and untaping.
The next project took even longer to do but for entirely different reasons.  The darkest purple wall I had decided to do with a brush stroke texture,  I had liked the effect so had decided to go with that under the stairs in the Honorable Blue.  At some point between Wayne and I things took a bit of a turn and more than brush stroke started to happen.  With the blue we ended up liking the way waves of strokes looked and then things just started rolling for there,  sometimes Wayne probably wants to run when I say "I have/had and idea" but since this one was partly his fault, (he is too good at feeding that creative part of my brain sometimes) and I was doing all of the work he can't be too dismayed.
These first two photos show the first coat of the many value waves going onto the wall.  They are all done with a glaze mixed with the paint so I never knew exactly how things where going to turn out.  That turned out to be both a challenge and sort of freeing, of course Wayne also reminded me that the worse that could happen is that we would repaint it.
The second coat goes on here, just a tad darker and filling in more, occasionally thought the process Wayne would say something about how he thought I was going to do this or that, not so much.  I seldom went with a plan, I just kind of freed myself to play.  I didn't know how many coats it would take I just knew that I would know when I had it the way I wanted it.
Another coat goes on.  I had decided to do a coat a day because that would allow the paint to dry completely, since I wasn't measuring the amount of glaze or any of the paints I never knew exactly how the layers would come out.  I also wanted to have a bit of time to absorb one layer before deciding on the next.
This is a slightly different angle of the same coat.  I found that it was slightly hard to photograph this wall,  I couldn't take the photos straight on and it is really hard to truly capture what it looks like in real life.  I took different angles in the hope that I would at least get an idea of what it looked like.
These last three photos are of the finished wall.  Again it was really hard to photograph, it is wonderfully complex and variegated.  With all of the layers that went into it that probably isn't too big a surprise.
I really can't wait to get the pieces of artwork that are going to go on the wall ready to hang, one needs it's glass replaced and another needs to be properly framed.  I have chosen a few pieces that are all water related to possibly go on the wall,  I still need to figure out whether they will all fit or not but in a quick audition they all look striking against the wave wall.


The last picture (below) is a close up so you can better see some of the values included,  the colors aren't quite right but it gives you a better idea.   I really think once the art is up on the wall I will love it even more.

Thursday, March 3, 2011

In a World of Color

 Although as usual this last year or two this post is vastly overdue I am finally adding a new post.  These photos and info on the on-going projects to make our house a home come from January.  It ended up being a very productive month for us and we got several projects finished.  The major projects are pictured here.  I am assuming you can guess what Wayne is doing crawling around on top of the counters in this photo,  I made him paint all of the difficult areas.
 This is a photo of one of our two copper walls,  it is a decorative painting technique using copper paint and glaze.  It is amazingly difficult to photograph but it looks different no matter which direction you look at it and how the light hits it.  I am beyond pleased with how it turned out, even if I ended up with some copper highlights for a couple of days.
 Another project checked off the never ending To-do list that we seem to have is the curtains for the living room.  I started by cutting the fabric to length well over a year ago.  It has been slow going but the red metallic looks great with all of the other red accents in the room.
 With the pull backs you can choose a couple of different ways to pull the curtains back,  in the middle of winter any sun is a good thing so they don't get closed except when it is nasty or really cold out.
 Here you can see the 2 walls of copper and my myriad collection of house plants,  I have been doing remarkably well with them considering I have a brown thumb most of the time with plants.   Our poinsettias from last year are even blooming this year without having put them in special lighting.  Got 3 new ones this year as well.
 Here you can see the Hyper blue against the copper, quite a striking combination.  As usual if you have been watching the decor come together you know our colors are not too subtle but they make me happy, how did I get so lucky as to have found a spouse who doesn't think all walls should be white??????
Although we still haven't gotten to the back splashes or even put knobs on the cabinets, adding the color has really added personality to the kitchen.  So many projects yet to do, knobs, back splashes, floor, plant tables....  And that is just the kitchen.

Tuesday, June 22, 2010

Catching Up With Life

I swear it feels like all I do is try to catch up with my life,  I am so far behind on so many things that my To-Do lists have to-do lists.  I can't seem to get really focused on anything so am doing a lot of bouncing around on projects for the house and creatively.  At this point all of our stuff is out of storage although plenty of it is still in boxes.  The photo above is my studio in mid April after the move but before some of the new additions to the room.
Memorial Day weekend we rented a cargo van and headed up to College Park and hit the Ikea.  I had been wanting to go for a while but timing had never worked out.  For our 20th Anniversary at the beginning of the month that is what I told Wayne I wanted (to go to Ikea before he headed off fishing with some of the men in his family).  We spent the weekend  building furniture (about 1500 lbs worth).  This photo does not include everything we got.
These are my new blue bookcases,  they go well with the blue wall across the room from them as well as the blue ceiling fan.  They are no longer near this empty. We got 2 of these for the Office although those aren't built yet.

This is the new Expedit desk and shelves.  I got another unit like the one on the left for the other side of this wall as well as 2 of them for our master bedroom.  They are pretty cost effective and have lots of space for books, art supplies and bears.
Yes the couch is still in my studio,  will figure out what kind of nesting chair I want to put in my studio once we finally get the great room finished and the couch where it belongs.  You can see my new desk for creating behind it.  Now I have 2 big work tables to create on.  The top is a beech countertop that I still need to oil or otherwise finish.  You can also see that some of the stuffed animals were quick to find homes on the new shelves.
While Wayne was gone for 10 days you would think that I spent most of my time getting my studio organized and I did a bit but I spent more time on a couple of other projects that I knew needed getting done.  I managed to finish painting the last of the base moulding and almost all of the crown moulding for the great room while he was gone.  The photo is of some of the crown moulding which is red with a copper paint accent.  3 coats of each color on 8 pieces meant it took a bit of time, but I can't wait to see how it looks like up.  The only thing we need to paint yet is the corner pieces but Wayne needs to do something to them before I can paint them.
The other big project I tackled while he was gone was the Master Suite.  I was getting tired of the clutter everywhere and boxes and........   So the new Expedit shelves went in and I completely rearranged it, including moving the bed on angle to the room.  There are still project to be done but it feels much calmer since it is less jumbled.  I like the bed on the angle since when you walk into the room you can see so much of the hardwood floors showing.
I also got my Sacred Space up in our bedroom.  The table contains a lot of my treasures that I collect here and there.  Some are pieces of the world around me that I have picked up, some are pieces of my art and a few are pieces of art and odd bits that I like.  The piece on the wall is one of my newer finished pieces.   It is my Zentangle Dragonfly, if you want to read a bit about it I included some of that in my BJP blog.  I will try to write a post later about how I finished it.  At this point I am planning on adding my 2010 BJP piece to this wall as well once it is finished.  I have added candles to the table and I want to make it more stair step so that things are easier to see.
Since Wayne has been home he has put up the ceiling fan in the great room and we spent all day on Sunday trying to get the basement organized.  Before Wayne can do most of what needs doing in the great room he needed his table saw up and running and to be able to work down there.  The basement is the general storage area and looked like a cardboard factory had blown up down there.  It isn't completely organized yet but like things are together and most of the boxes are unpacked.

I was hoping that we would be able to work on the great room this upcoming weekend but think the time may end up going to Wayne's car since it has been acting up,  may need some transmission work.  If so sounds like I even get to help some (I am sooooo excited).

The projects around the house are coming along but it will be a work in progress for a while.  With unlimited budget, energy and time we would be further along but I love how it is coming along and it is showing our personalities.  It will be a one of a kind, no doubts.   If you would like to see more photos remember we have the Web Gallery that has more photos.

Also if you are interested I am on Facebook now.  I play games too much but I do put short updates on some of the things I am up to there.