Monday, December 13, 2010

Colors of Fall

If you have been following my blog you know that a little over a year ago Artbeads.com chose me to be one of their Design Partners that review their products and make pieces using them.  If you have not had the chance you should check out their facebook page and their online galleries.  They have some very talented designers who cover a range of styles and techniques.
This calender year they have been going with a seasonal theme for each of the projects and this one is the fall theme.  I finished my piece a few weeks ago but hadn't gotten around to blogging about it.  I got a bit overwhelmed trying to get ready for Christmas since I had decided to spend from the 30th of November until the 21st of December at Iowa with my folks.  I will be home just over a week and then off to Wayne's folks for New Year's and his Dad's Birthday.  Trying to get handmade cards made and ready to go out, planting and Christmas shopping took up all of my available time and head space.
 So here it is a bit late but it is done and turned out very much like I planned.  The photo above is the beads I requested.  One of the challenges of doing this is trying to figure out what beads will work best for the project and how many you need, but WOW is it fun looking through their website and trying to figure it out.  I love being able to try new types and colors of glass beads and working with different pendants.  They have soooooo many beautiful products.   When they said that it was a fall theme I immediately remembered seeing their selection of copper leaf pendents.  I have really been enjoying working with copper lately and couldn't resist this beautiful leaf.

But how to showcase the pendant and really show the richness of the "Colors
of Fall"? Finally I decided on going with an embellished spiral rope. This gave me a lot of leeway on how to make the piece with all of the wonderful intensity of fall.
The first photo show the selection I chose although the copper wire is not in the photo.  The second photo shows the spiral rope.  The sides of the rope include the 4mm Jet Picasso Matte fire-polished beads as the accent bead.  I didn't include them in the center section because they would later be hidden.  I have really fallen in love with the different finishes on the Czech beads and must admit that Jet Picasso is a favorite (in different sizes and shapes it is always yummy).
Here you can see the spiral rope after it has been embellished.  I used Toho 8/0 Hybrid seed beads in Apollo to embellish along the sides.  They looked really neat on the website (kind of coppery) but in really life I love them even more.  They have a transparent glass with a metallic copper finish that from some angles almost make them look like copper beads but they are so much more exciting than that.  In the center section of the necklace I used various fringing techniques to embellish the spiral rope.
In this close up you can see some of the beads better.  With a mix of seed beads, the Red, Black, and White Porohyr, 3x2mm Orange mix Picasso Roundelles,  and 5x4mm Autumn Mix Roundelles.   I took the copper wire and spiraled that around the center section of the necklace blending the copper of the leaf into the copper of the wire and up toward the coppery Apollo beads. The copper pendant is hanging from the copper wire spiral and can be removed so that the necklace is more versatile. I also used the copper wire to make clasps for the necklace and one of the bracelets as well as for the main part of the earrings.
I used some of my left over beads with more supplements from my collection to make a pair of earrings as well as two bracelets that I could wear with the necklace.  Making my own ear wires was a first for me as was using wire to make toggle clasps and I love how they turned out.  None of them take much wire and are very cost effective and they can be customized to go with the jewelry.
In these last 2 closeups you can see the copper spiral better as well as the beads and the copper pendent.  The over all piece is a bit darker than I had originally planned up I love how it turned out and how rich it looks.

Disclosure...As a reviewer of products at Artbeads.com, I receive the Copper pendant and Glass Beads above free of charge. I have been asked to review these products and give my honest opinion of the products...positive or negative. I am not being compensated by Artbeads.com for my endorsement as it pertains to the products received and reviewed.

Sunday, December 12, 2010

Grow where you are planted: part 2

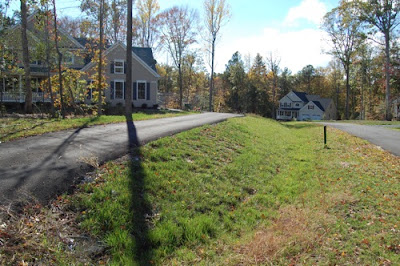
Here you can see as you come up the drive way (did I ever mention that we got a nice paved driveway early this summer?).  This is photo is another partially before photo although you can see where I have been doing some digging to the left of the photo.
Although I think that you are supposed to have a plan for your garden before you start we haven't really been doing that too much, it has been more of a what next and hope that it all works out OK in the end.  Here you can see the driveway better and the nice bank down to the ditch that is very boring here.


Wow somebody has been digging lots of wholes in the yard, I am thinking some seriously big moles.  Trees bushes and 100 or so bulbs are going here (the bulbs are in we are still waiting for the National Arbor Society to deliver the baby trees and bushes.
You can also see the grasses that we moved from where the builder had put them in the front yard to the side of the driveway.
Here is a picture of my favorite garden gnome (isn't he cute).  I started the gardening project but he started helping and with the 2 of us we got a lot more done more quickly.
You can also see another section that we dug up and planted.  This area has more bulbs, asters, and a variety of plants that Mom sent us.
More asters, bulbs, iris, lilies and a Korean lilac (I love sales at Lowe's).
 
I will leave you with this final photo of a fall mum that was blooming as I left for Iowa shortly after Thanksgiving.  We planted close to 1000 bulbs, 8 or so bushes, iris, lilies, pansies, mums, peonies and several other flowers this fall.  We are still waiting for the arrival of 11 trees and 14 bushes that we have the wholes dug for.  I am hoping that I will be able to update you in the spring with lots of photos of flowers blooming and plants happily taking off.

Wednesday, December 8, 2010

Grow where you are planted


As I write this I am in Iowa and enjoying spending time with my folks and looking forward to this upcoming weekend when we will be celebrating Christmas and the 40th Anniversary of Mom adopting the 3 of us kids.  I can't imagine 2 weeks before Christmas suddenly have  a 1,2, and 3 year old.  Tomorrow Betsy and David, my husband Wayne and Chris should all arrive.  Will be the first time in a while that we have all been here together (usually Wayne is missing because of deployments or such).

I thought I would try to spend a little of my time here trying to catch up a little bit on my blogging which is so far behind as to be ridiculous.  I apologise to those who like to keep up with what is going on in my life. 

This fall Wayne and I have been putting some time into trying to get a start on the landscaping for the house.  The builders put in some plants and we got to keep some of the trees in front and back but we want to give the place personality and as we should be living in the house for quite a while we finally have a chance to put in flowers I have wanted to add for years.  The photo above is one of the 3 boxes of flowers and bulbs that my Mom sent to us.  Some of the plants are cuttings from plants that were my Grandma's and the rest are from Mom's garden which means there will be flowers from 3 generations of the women in our family.

A serious challenge to our yard is that the soil is clay and in the spring they had heavy machinery on it  grading, add the drought we had this summer and the soil is seriously compacted and hard to work so anywhere we wanted plants we had to dig it up and loosen it up before adding some real dirt to it.  This second photo shows one of the sections I had been working on.  The original plan wasn't near this ambitious but we just kept adding and adding......
This was the first area I dug up and planted.  It is in front of our trees in the front yard.  I planted mums, nandina (heavenly bamboo), pansies and violas as well as close to 300 bulbs.  We are hoping that everything will take off and we will have a nice area in the front .
We kept going back to Lowe's (we should buy stock we shop there so much) to get more dirt and plants etc for our growing fall project.  One advantage to this is that we manage to get plants that they were getting rid of and paying 25-75% less was very helpful and allowed us to buy more plants than we otherwise would of.  The 3 bushes above will hopefully grow into a sort of hedge between the neighbors side yard and ours.  It is a big empty space that the grass didn't really take well on so it can use something interesting.
This photo is partially here as a before photo since the builders put this area in, I added the Asiatic lilies and pansies to it but later you will see what we added.
Here is the area you saw in the 2nd photo once it has been worked more and plants and bulbs put in.  The only this you can see here above ground is the 2 bushes (more sale prices at Lowe's) but there are also many more bulbs under the ground just waiting for spring to come (at least we hope).

In part 2 I will include more photos and more of what we planted.